Installation Instructions For myQ Smart Garage® Video Keypad POWER Adapter, v1
Thank you for purchasing myQ Smart Garage® Video Keypad POWER Adapter. We've designed our installation and wiring guides to be clear and easy to follow, so you can get everything set up quickly and confidently.
If you find this task beyond your comfort level, we recommend consulting a local electrician for assistance. We are a licensed and Insured Electrical company (JTP Electric) and could provide electrical service/installation if you are local to 60714.
To complete this installation, you will need the following:
• Cordless drill.
• Drill bit, 1/4″, regular size length, or step drill.
• Drill bit 1/4″, 12″ long.
• 5VDC, 3A, power supply: $7.57 ( https://amzn.to/3zOub82 )
• Power cable, two conductors, 18AWG: $14.97 ( https://amzn.to/4cKFD2R )
Quick explanation
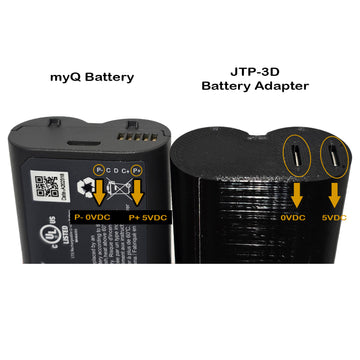
Quickly before we begin, I would like to explain why the POWER Adapter has only 2 contacts, and the original myQ Battery has 5 contacts.
Please note on the myQ battery two contacts on each end, marked P- and P+. P- is 0VDC and P+ is 5VDC. The rest of the contacts, C, D, and C+ are temperature sensors to prevent the battery from overheating while charging. Usual contacts on any LI-ION battery.
To power up the myQ Smart Garage Video Keypad, with external 5VDC power, it requires only 0VDC and 5VDC.
Step 1
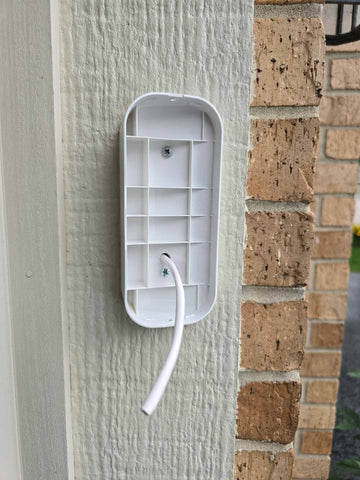
If your myQ Video Keypad unit is installed, first, remove the unit from the mounting bracket. Then use 1/4″ long drill bit to drill through the myQ video keypad mounting bracket and the garage door jam.
Step 2
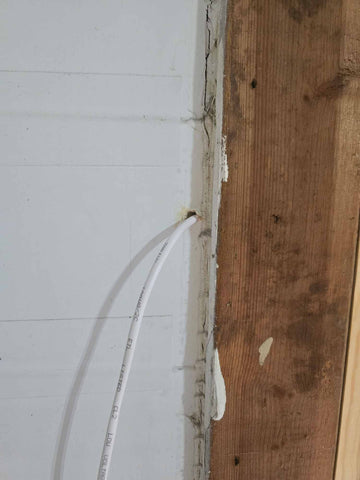
Once you drill through the bracket and door jam, push the 2 conductor cable through the hole. Image 2 represents the view inside of your garage.
Step 3
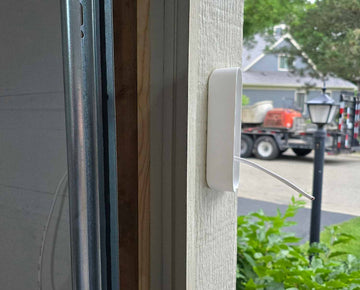
Leave about 5″ – 6″ of wire exposed outside for easy wiring. You can always pull extra wire inside of the garage when you finish wiring.
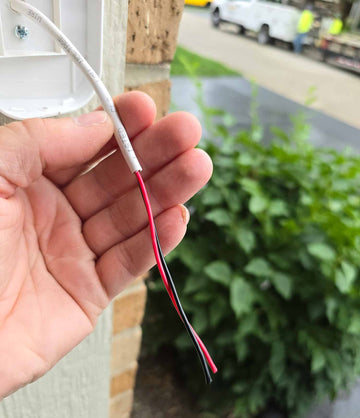
Step 4
Strip back cable insulation about 4″ exposing black and red conductors. Make sure you don’t damage the conductors.
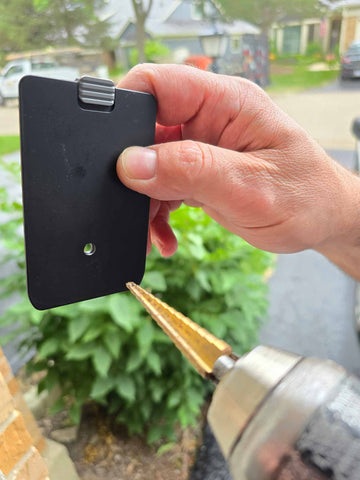
Step 5
Remove the battery cover from the unit and drill a 1/4″ hole on the lower end of the cover.
NOTE:The hole size depends on the wire you are using to power up the unit. In our case, the cable is about 1/4″ diameter and we used a step drill to make a hole.
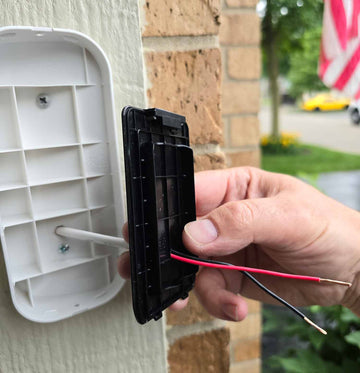
Step 6
Push the wires through the hole on the battery cover.
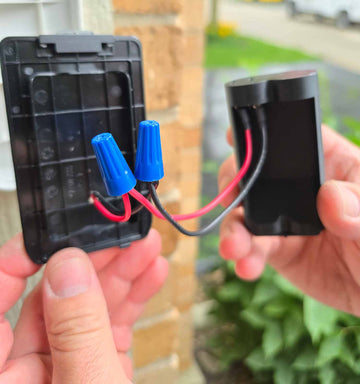
Step 7
Use included wire nuts and connect wires to the red and black wire on the battery adapter unit.
NOTE:
- RED is connected to the plus pole 5VDC on the power supply, and
- BLACK wire is connected to the minus pole or 0VDC on the power supply.
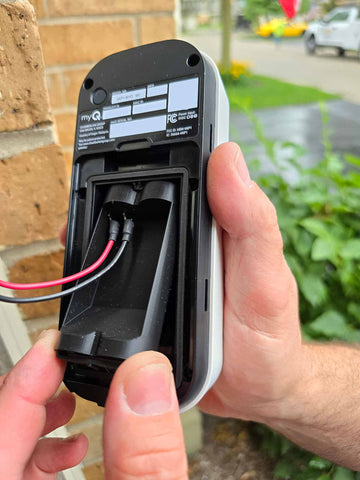
Step 8
Insert the POWER adapter into the myQ Garage Door Opener, the same way you insert the original myQ battery. Top part first.
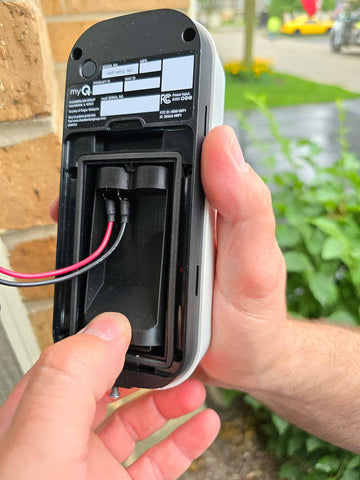
Step 9
Once the top part of the POWER adapter is in, push the bottom part of the adapter until it clicks in.
NOTE:
After you insert the POWER adapter, temporary connect the power to test the connection. If the myQ unit powers up, continue with the installation.
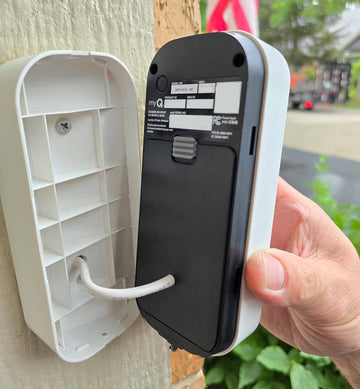
Step 10
Secure the battery cover back to the unit and install it back onto the bracket. Push the extra wire back in the hole and in the garage. Secure myQ unity with a small screw on the bottom of it.

Step 11
Continue running the cable back to the 5VDC power supply. It is recommended to use 2A power supply for this installation.
Thank you for purchasing our product. I hope that the instructions make installation a breeze!
If you are looking for a Power Supply and an appropriate cable, please visit the links to Amazon.com to purchase them.
• 5VDC, 3A, power supply: $7.57 ( https://amzn.to/3zOub82 )
• Power cable, two conductors, 18AWG: $14.97 ( https://amzn.to/4cKFD2R )
FAQ
Why the POWER adapter has only 2 contacts and the original battery has 5 contacts?
Please note on the myQ battery two contacts on each end, marked P- and P+. P- is 0VDC and P+ is 5VDC. The rest of the contacts, C, D, and C+ are temperature sensors to prevent the battery from overheating while charging. Usual contacts on any LI-ION battery.
To power up the myQ Smart Garage Video Keypad, with external 5VDC power, it requires only 0VDC and 5VDC.
What is the appropriate Voltage and Amperage
The required voltage for myQ Smart Garage® Video Keypad is 5VDC and 2A.
myQ Smart Garage® Video Keypad doesn't power up
If the myQ unit doesn't power up after you insert the POWER adapter:
- Make sure the Power Supply is rated 5VDC, 2A
- Make sure that the POWER adapter is properly wired. RED wire to +5VDC and BLACK wire to 0VDC
- Make sure that the POWER adapter is properly sitting inside the myQ Garage Video Keypad. Remove it quickly and re-insert it.
myQ Smart Garage® Video Keypad can't connect to my home network
If this is your first time connecting garage door keypad to your home network, try establishing a network connection using the original battery that came with a unit. When the network connection is established successfully, remove the battery and use the adapter. If at that point myQ Smart Garage® Video Keypad is not connecting to your home network, make sure that the power supply is supplying a proper 5VDC, and it is rated minimum 2A.
Power Supply is providing 5VDC, but I the myQ unit is still not powering up
If you measure the appropriate 5VDC voltage on your power supply, but the myQ unit is still not powering up, make sure you have 5VDC at the adapter. Remove the wire nuts and measure the voltage where thewiresare spliced. If you don't have 5VDC, it looks like you might have a problem with the wire supplying power to the POWER adapter. You might need to change the wire.
Can you recommend the appropriate Power Supply for this application
Yes, we can definitely recommend a Power Supply for this application:
- 5VDC, 3A, power supply: $7.57 ( https://amzn.to/3zOub82 )
Can you recommend the appropriate Cable for this application
Yes, we can definitely recommend a 2 conductor cable this application:
- Power cable, two conductors, 18AWG: $14.97 ( https://amzn.to/4cKFD2R )
Everything seems to be OK, but the myQ unit is still not powering up
If you checked everything suggested above, and the myQ unit is still not powering up, please contact us. We would love to talk to you over the phone to figure out why the myQ unit is not powering up.
